How to bring a song's sections into Premiere Pro, DaVinci Resolve or Final Cut as markers
You already know where the intro ends and the chorus hits. Here is how to get those points onto your editing timeline as markers — by hand, or as a file your editor imports.
When you edit to music, the edit is decided before you open the editor. The song already has a shape: an intro that holds back, a build, the moment everything opens up, a way out. If you planned your shots against that shape, the first thing you want on an empty timeline is that shape — a marker where each section starts, with its name on it.
Most people rebuild it by ear: play the track, tap M when it feels right, nudge, rename. It works. It is also the third time you've found those same points — once when you planned, once when you shot, and now again.
This guide covers both ways: doing it by hand properly, and importing the sections as a file. Each of the three big editors wants something different, and that is where people get stuck.
What you need first: the sections, in seconds
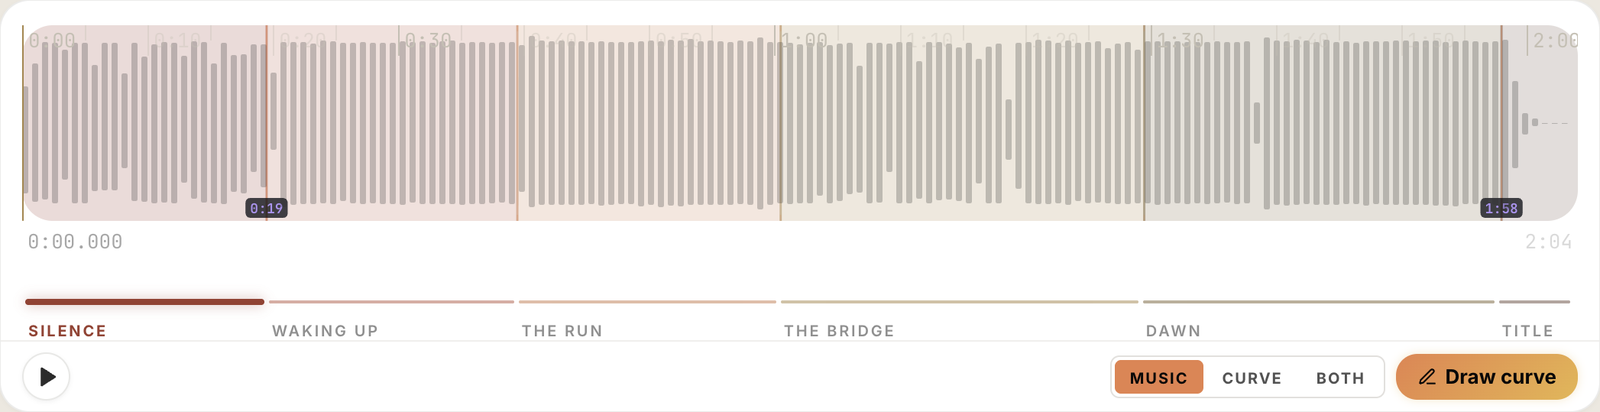
Whatever route you take, you start from a short list: the name of each section and the second it starts on.
| Section | Starts | Ends |
|---|---|---|
| Silence | 0:00 | 0:19 |
| Waking up | 0:19 | 0:39 |
| The run | 0:39 | 1:00 |
| The bridge | 1:00 | 1:29 |
| Dawn | 1:29 | 1:58 |
| Title | 1:58 | 2:04 |
That is a real plan for a two-minute piece. If you don't have yours yet, how to cut a song into narrative sections gets you there in one listen and a half.
The manual way (works in any editor)
- Decide your frame rate before anything else. Markers live on frames, not seconds. A sequence at 25 fps and a list made for 24 will drift apart, and you'll notice at the end of the song, where it hurts most.
- Convert each start to timecode. Seconds stay seconds; only the last pair changes.
0:19is00:00:19:00. A cut at 19.5 s is00:00:19:12at 25 fps (half a second is 12.5 frames — round it, and be consistent). - Put the song on the timeline first, starting at the very beginning of the sequence. Every marker is measured from there; if the track slides later, every marker is wrong by the same amount.
- Go to each timecode and press
M. In all three editors you can type a timecode to jump the playhead. PressMonce to drop the marker,Magain (Premiere, Final Cut) or double-click it (Resolve) to name it. - Name it like the plan, not like the song. "Chorus 2" tells you nothing at 1 a.m. "The bridge — they finally meet" tells you what footage belongs there.
Six markers take five minutes. Forty — one per planned shot — take an evening, and that is the point where a file starts to make sense.
The import way: each editor wants a different file
There is no single "markers file" that all three editors read. This is what each one actually accepts:
| Editor | File it imports as markers | Where they land |
|---|---|---|
| DaVinci Resolve | EDL (.edl) |
On the timeline you chose |
| Premiere Pro | Final Cut 7 XML (.xml) |
In a new sequence |
| Final Cut Pro | FCPXML (.fcpxml) |
In a new project, inside an event |
Two traps worth knowing before you lose an hour:
- Premiere does not turn an EDL into markers. It imports it as a cut list and gives you offline clips. Markers only come in through XML.
- None of these files carries your footage or your song. They are markers only. You drop the track and the clips in afterwards.
DaVinci Resolve — EDL
Resolve can import markers from an EDL, and it is the simplest of the three because the format is plain text. This is what two of the sections above look like:
TITLE: Dawn
FCM: NON-DROP FRAME

001  001      V     C        01:00:00:00 01:00:00:01 01:00:00:00 01:00:00:01
 |C:ResolveColorRed |M:Silence |D:475

002  001      V     C        01:00:19:00 01:00:19:01 01:00:19:00 01:00:19:01
 |C:ResolveColorRose |M:Waking up |D:500
|M: is the marker's name, |C: its colour, |D: its length in frames (19 seconds at 25 fps is 475).
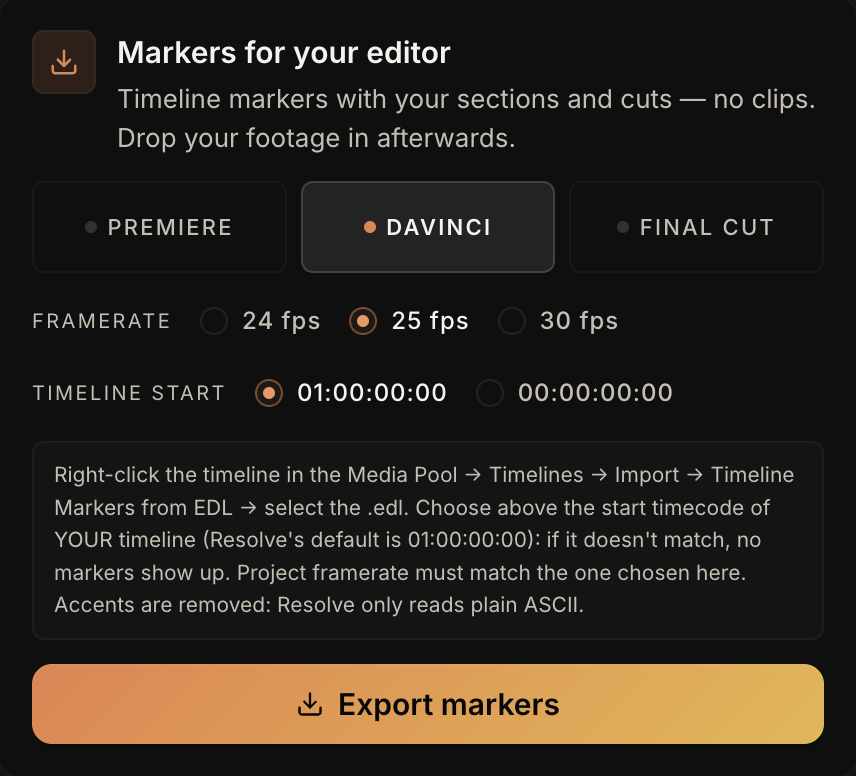
To import it: in the Media Pool, right-click your timeline → Timelines → Import → Timeline Markers from EDL, and pick the file.
Three things decide whether the markers show up at all:
- The start timecode must match your timeline. Resolve timelines start at
01:00:00:00by default, which is why the example does too. If yours starts at00:00:00:00, the file has to as well — otherwise the import succeeds and you see nothing. - The project frame rate must match the one the file was made for.
- Plain ASCII only. Accents and symbols get lost on import. "Canción" arrives broken; "Cancion" arrives fine.
Premiere Pro — XML
Premiere reads markers from Final Cut 7 XML, the same format it writes with File → Export → Final Cut Pro XML. It is not something you would write by hand.
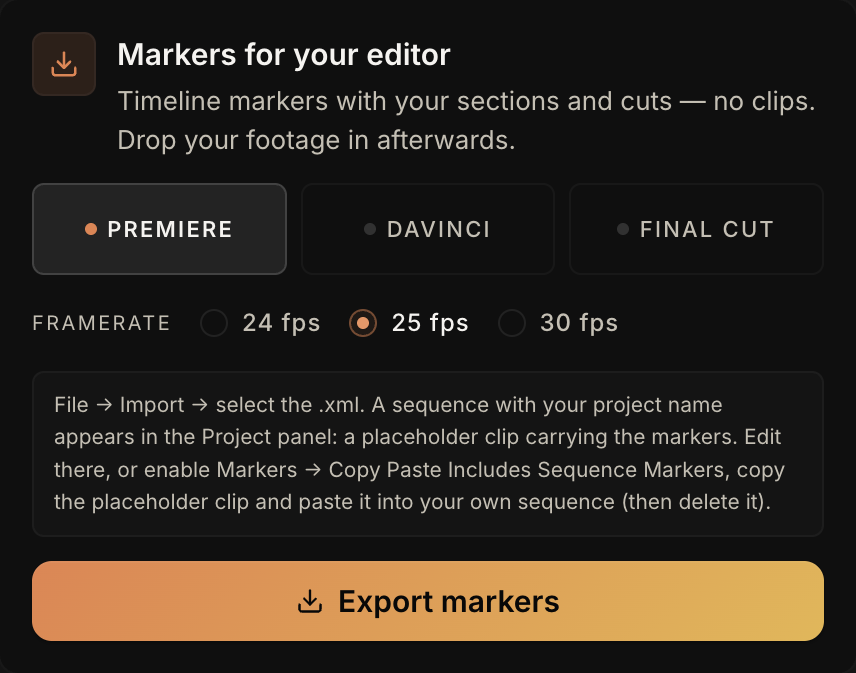
To import it: File → Import, select the .xml. A new sequence appears in the Project panel, holding a placeholder clip that carries the markers.
From there you have two options:
- Edit in that sequence. Drop your song and footage in; the markers are already there.
- Move the markers to your own sequence. Enable Markers → Copy Paste Includes Sequence Markers, copy the placeholder clip, paste it into your sequence, then delete the clip. The markers stay.
Final Cut Pro — FCPXML
To import it: File → Import → XML, select the .fcpxml. You get a new event with a project inside: a silent gap the length of the song, holding the markers. Sections arrive as chapter markers, individual shots as standard markers, and any notes show in the Timeline Index.
Edit there, or copy the gap into your own project and build on top of it.
The same thing in PreFrame
PreFrame is where that list of sections comes from in the first place: you drop the track in, cut it into sections on the waveform and place each shot on real seconds. Exporting the markers is the last step of planning, not a separate job.
In the editor, Export opens one dialog. Under Markers for your editor you pick the editor and the frame rate — 24, 25 or 30 — and it writes the right file for that editor: .edl for Resolve, .xml for Premiere, .fcpxml for Final Cut.
For Resolve there is one more choice, and it is the one that catches everyone: the start timecode of your timeline.
What ends up in the file:
- One marker per section, with its name, in the section's colour where the editor keeps colours.
- One marker per shot, with the shot type and your notes in the marker's comment — so at the edit you read "Extreme wide, static drone at 80 m" on the exact frame it was planned for.
- One marker per frame, always. Editors only allow one; if a section and its first shot start on the same frame, they are merged into a single marker instead of one silently disappearing.
- Clean text for Resolve: accents are stripped for you, because Resolve would drop them anyway.
The same dialog also makes the shooting plan — a printable PDF with every shot, its timecode and the time you still haven't covered. Planning, shooting and editing all read from the same seconds. How the export and the audio lock work is explained in support.
Before you close the editor
- Check the first and the last marker against the music. If the first is right and the last is late, it's a frame-rate mismatch. If both are off by the same amount, the song isn't at the start of the timeline — or, in Resolve, the start timecode doesn't match.
- Lock the music track once the markers line up. Everything you cut from here on hangs off those points.